Syntax Highlighting for smartGENERATOR
This page describe the Syntax Highlighting options supplied for smartGENERATOR
Ultraedit
Ultraedit uses so called "Wordfiles" for syntax highlighting
To add the File:Smartgenerator.uew you might want to follow the instructions at:
or use the automatic install script you find below.
Example of Ultraedit smartGENERATOR syntax highlighting
Vim
You can install the File:Smartgen.vim in your vim environment and manually call:
set syntax=smartgen
to activate it. The sgsyntax script below will automatically find your vim base directory and also modify your filetypes.vim file. Unfortunately there is a special rule for configure.in in filetypes.vim so you might want to manually move the
" smartGENERATOR *.in files
au BufNewFile,BufRead *.in setf smartgen
definition up to where configure.in his handled or even remove that special case in favor of the smartGENERATOR case
Example of Vim smartGENERATOR syntax highlighting
Eclipse
smartGENERATOR Editor plugin
The File:SmartGenEditorPlugin.zip can be used to install an editor that can syntax-highlight the smartGENERATOR Template files. It depends on your version of Eclipse how this Eclipse Version 2.0 Plugin needs to be installed. For Eclipse Versions prior to Luna you can simply unpack the Plugin from the ZIP file so that it contents are in the plugin directory (please note that the zip is including the plugin directory so it may be necessary to move the content after unpacking).
For newer versions you might want to unzip the contents to the dropins/eclipse/plugins directory or use the install script below. Please also make sure you install the Eclipse Version 2.0 Plugin support into your eclipse environment see https://stackoverflow.com/a/24519677/1497139.
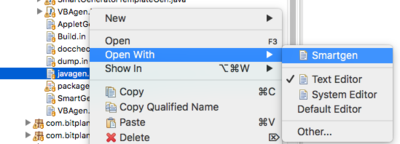
To call the smartgen editor right click open with in the package explorer and the select "smartgen" as the editor:
Example of Eclipse smartGENERATOR syntax highlighting
notepad ++
<NotepadPlus>
<UserLang name="smartGeneratorTemplate" ext="in" udlVersion="2.1">
<Settings>
<Global caseIgnored="no" allowFoldOfComments="no" foldCompact="no" forcePureLC="1" decimalSeparator="0" />
<Prefix Keywords1="no" Keywords2="no" Keywords3="no" Keywords4="no" Keywords5="no" Keywords6="no" Keywords7="no" Keywords8="no" />
</Settings>
<KeywordLists>
<Keywords name="Comments">00#. 00. 01 02 03' 03" 04' 04"</Keywords>
<Keywords name="Numbers, prefix1"></Keywords>
<Keywords name="Numbers, prefix2"></Keywords>
<Keywords name="Numbers, extras1"></Keywords>
<Keywords name="Numbers, extras2"></Keywords>
<Keywords name="Numbers, suffix1"></Keywords>
<Keywords name="Numbers, suffix2"></Keywords>
<Keywords name="Numbers, range"></Keywords>
<Keywords name="Operators1"></Keywords>
<Keywords name="Operators2"></Keywords>
<Keywords name="Folders in code1, open"></Keywords>
<Keywords name="Folders in code1, middle"></Keywords>
<Keywords name="Folders in code1, close"></Keywords>
<Keywords name="Folders in code2, open"></Keywords>
<Keywords name="Folders in code2, middle"></Keywords>
<Keywords name="Folders in code2, close"></Keywords>
<Keywords name="Folders in comment, open"></Keywords>
<Keywords name="Folders in comment, middle"></Keywords>
<Keywords name="Folders in comment, close"></Keywords>
<Keywords name="Keywords1">#META</Keywords>
<Keywords name="Keywords2">#IMPORT
#endfor
#endif
#else
#for
#if
#TYPE</Keywords>
<Keywords name="Keywords3"></Keywords>
<Keywords name="Keywords4"></Keywords>
<Keywords name="Keywords5"></Keywords>
<Keywords name="Keywords6"></Keywords>
<Keywords name="Keywords7"></Keywords>
<Keywords name="Keywords8"></Keywords>
<Keywords name="Delimiters">00< 01 02> 03 04 05 06 07 08 09 10 11 12 13 14 15 16 17 18 19 20 21 22 23</Keywords>
</KeywordLists>
<Styles>
<WordsStyle name="DEFAULT" fgColor="000000" bgColor="FFFFFF" fontStyle="0" nesting="0" />
<WordsStyle name="COMMENTS" fgColor="808080" bgColor="FFFFFF" fontStyle="0" nesting="0" />
<WordsStyle name="LINE COMMENTS" fgColor="008080" bgColor="FFFFFF" fontStyle="0" nesting="0" />
<WordsStyle name="NUMBERS" fgColor="000000" bgColor="FFFFFF" fontStyle="0" nesting="0" />
<WordsStyle name="KEYWORDS1" fgColor="0000FF" bgColor="FFFFFF" fontStyle="0" nesting="0" />
<WordsStyle name="KEYWORDS2" fgColor="FF0000" bgColor="FFFFFF" fontStyle="0" nesting="0" />
<WordsStyle name="KEYWORDS3" fgColor="804000" bgColor="FFFFFF" fontStyle="0" nesting="0" />
<WordsStyle name="KEYWORDS4" fgColor="000000" bgColor="FFFFFF" fontStyle="0" nesting="0" />
<WordsStyle name="KEYWORDS5" fgColor="000000" bgColor="FFFFFF" fontStyle="0" nesting="0" />
<WordsStyle name="KEYWORDS6" fgColor="000000" bgColor="FFFFFF" fontStyle="0" nesting="0" />
<WordsStyle name="KEYWORDS7" fgColor="000000" bgColor="FFFFFF" fontStyle="0" nesting="0" />
<WordsStyle name="KEYWORDS8" fgColor="000000" bgColor="FFFFFF" fontStyle="0" nesting="0" />
<WordsStyle name="OPERATORS" fgColor="000000" bgColor="FFFFFF" fontStyle="0" nesting="0" />
<WordsStyle name="FOLDER IN CODE1" fgColor="000000" bgColor="FFFFFF" fontStyle="0" nesting="0" />
<WordsStyle name="FOLDER IN CODE2" fgColor="000000" bgColor="FFFFFF" fontStyle="0" nesting="0" />
<WordsStyle name="FOLDER IN COMMENT" fgColor="408080" bgColor="FFFFFF" fontStyle="0" nesting="0" />
<WordsStyle name="DELIMITERS1" fgColor="FF8040" bgColor="FFFFFF" fontStyle="0" nesting="0" />
<WordsStyle name="DELIMITERS2" fgColor="000000" bgColor="FFFFFF" fontStyle="0" nesting="0" />
<WordsStyle name="DELIMITERS3" fgColor="000000" bgColor="FFFFFF" fontStyle="0" nesting="0" />
<WordsStyle name="DELIMITERS4" fgColor="000000" bgColor="FFFFFF" fontStyle="0" nesting="0" />
<WordsStyle name="DELIMITERS5" fgColor="000000" bgColor="FFFFFF" fontStyle="0" nesting="0" />
<WordsStyle name="DELIMITERS6" fgColor="000000" bgColor="FFFFFF" fontStyle="0" nesting="0" />
<WordsStyle name="DELIMITERS7" fgColor="000000" bgColor="FFFFFF" fontStyle="0" nesting="0" />
<WordsStyle name="DELIMITERS8" fgColor="000000" bgColor="FFFFFF" fontStyle="0" nesting="0" />
</Styles>
</UserLang>
</NotepadPlus>
Syntaxhighlighting install Script
The Bash Script File:Sgsyntax.sh has been tested on Mac OS (Macports environment) and Linux to install the top three different flavors of Syntax Highlighting. Even if you intend to install the syntax highlighting in a different environment the source code might give you some insight on what is necessary. Please also give feedback to support@bitplan.com if you need adaptions to your environment.


